
How to Build a Chicken Coop: Sizes, Plans, and Step-by-Step Instructions
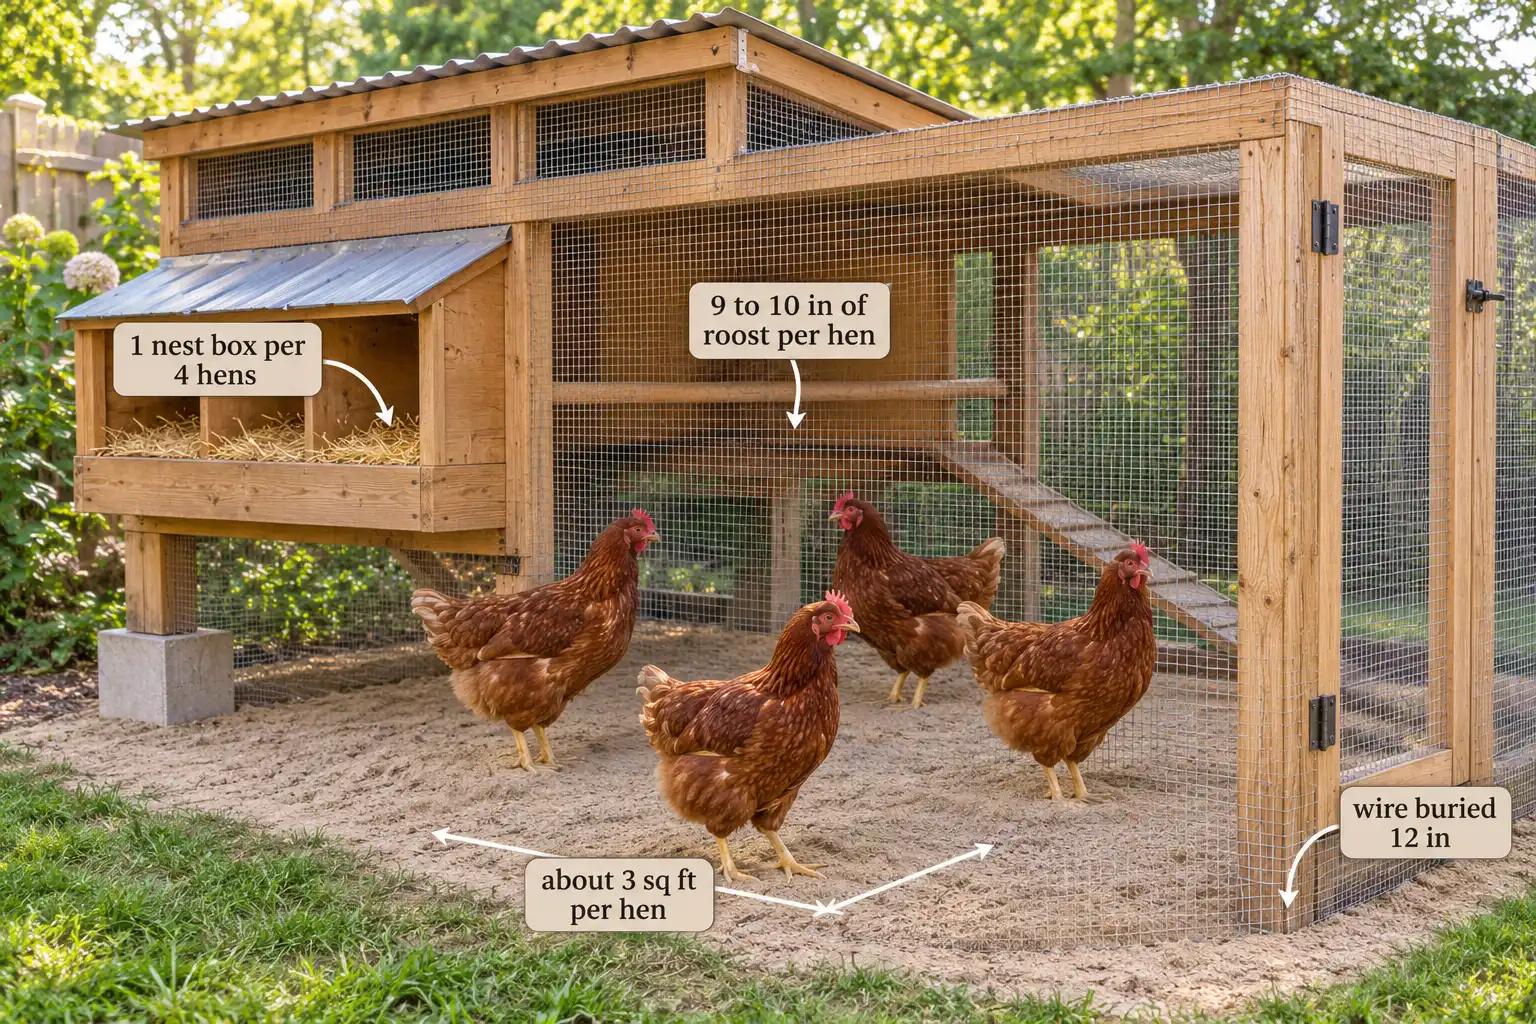
Building your own coop lets you size it to your flock, your yard, and your budget. This guide shows how to build a chicken coop from a free plan or from pallets. Each space, roost, and predator figure comes from extension guidance.
To build a chicken coop, start with size: Oregon State Extension advises at least 3 square feet per laying hen inside, plus a run. Next, raise a framed box off the ground, then add vents, roosts, nests, and hardware cloth.
What a Basic Chicken Coop Needs
A basic chicken coop needs a dry floor, walls, a roof, vents, roosts, nest boxes, and locking doors. Add a fenced, covered run, and the flock stays protected day and night.
Protection comes first. The Oregon State Extension coop design guide says a coop should close the flock inside at night. It also asks for a design you can enter and clean easily, because the coop needs a cleaning every week.
The coop also protects your family. Backyard hens can carry Salmonella even when they look healthy. For that reason, the CDC’s backyard poultry guidance calls for a sturdy, easy-to-clean coop outside the home. The CDC also advises keeping birds, supplies, and coop shoes out of the house. So plan a hose spot and a boot rack near the coop, not inside your back door.
Everything else, from paint color to window trim, is optional.
How Big to Build the Coop
Size the coop for the adult hens you plan to keep, not the chicks you start with. The NC State Extension garden flock guide sets a minimum of 2.5 to 3.5 square feet per laying hen indoors. It adds 4 to 5 square feet per hen in the fenced run.
The math is simple. Multiply your number of hens by the space per hen, then round up to a footprint you can frame.
| Standard-size laying hens | Coop floor | Example footprint | Roost length | Nest boxes | Run |
|---|---|---|---|---|---|
| 4 hens | 10 to 14 sq ft | 3 by 4 ft | 36 to 40 in | 1 | 16 to 20 sq ft |
| 6 hens | 15 to 21 sq ft | 4 by 5 ft | 54 to 60 in | 2 | 24 to 30 sq ft |
| 10 hens | 25 to 35 sq ft | 5 by 6 ft | 90 to 100 in | 3 | 40 to 50 sq ft |
Coop floor, roost (9 to 10 inches per hen), and run figures use NC State’s minimums. Nest boxes use Oregon State’s one box per four hens, rounded up.

Where the Space Figures Differ
Space figures differ by source, so give your plan some room. Penn State Extension’s small-scale housing guide lists just 1.5 square feet per laying hen inside. Its run figure is higher, at 8 square feet per hen. Oregon State asks for at least 3 square feet per bird inside when the flock has a run. With no outdoor access, that rises to 8 to 10 square feet.
In short, the less run space you give, the more coop floor your hens need. Bantam hens need less: Penn State gives them 1 square foot inside and 4 in the run.
Simple Chicken Coop Designs to Choose From
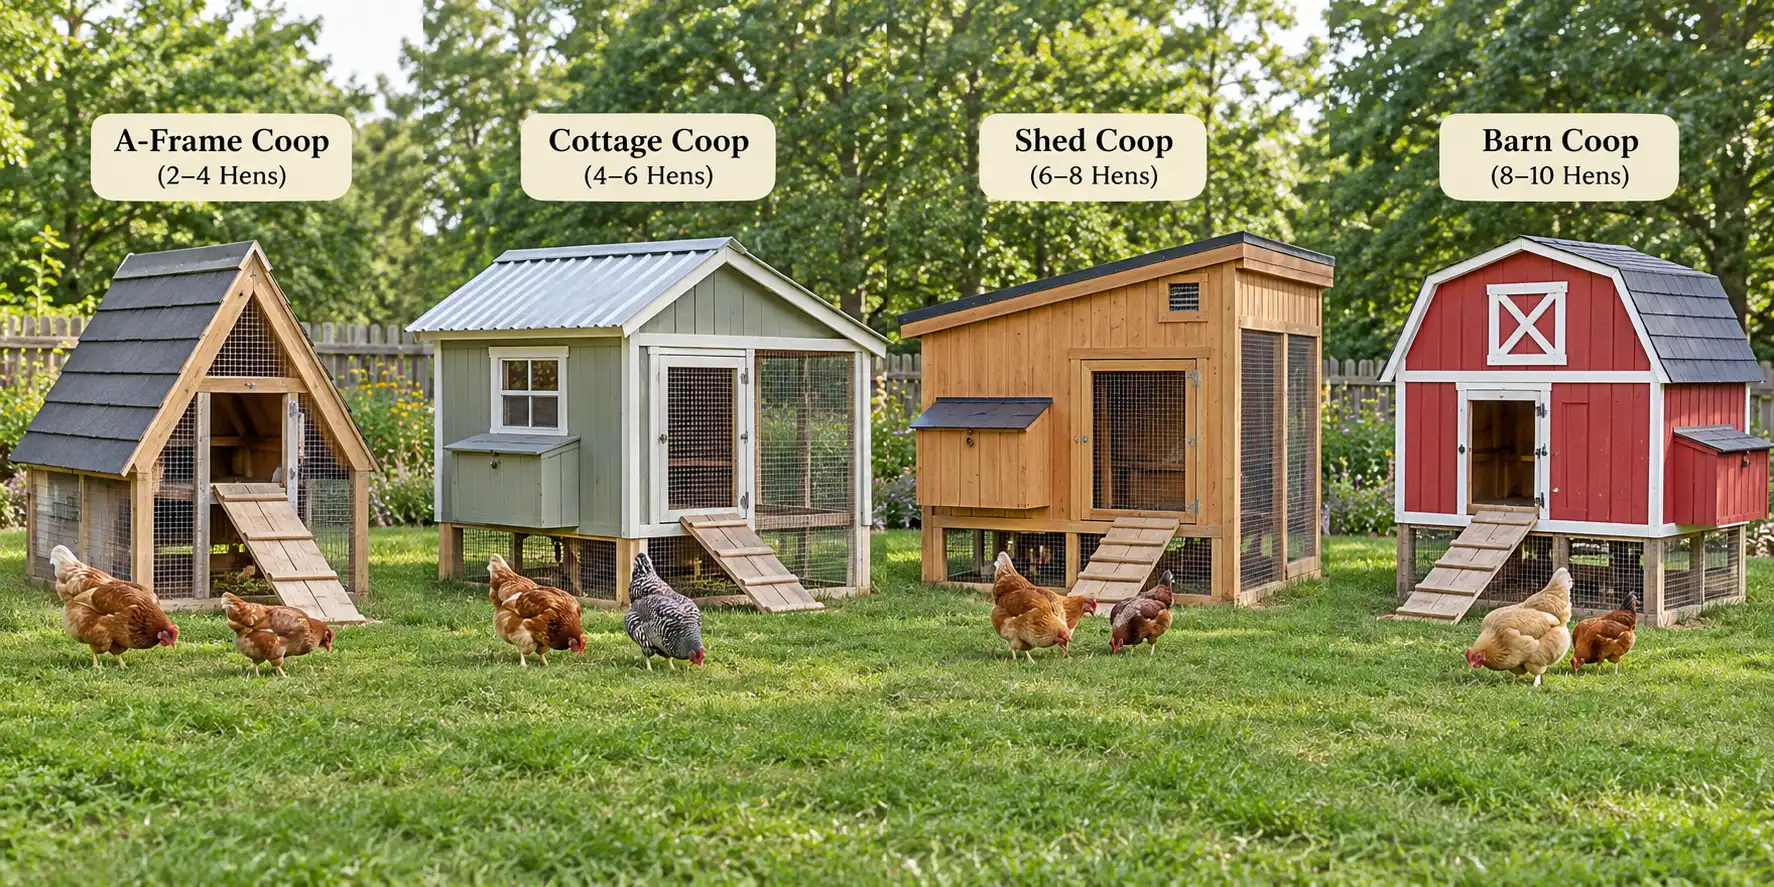
Most DIY chicken coop designs fall into four types. Pick the one that fits your flock size and how you want to clean it.
| Design | Flock it suits | Strength | Drawback |
|---|---|---|---|
| Raised box with attached run | Small flocks of laying hens | Fewest materials; dry shade underneath | Reach-in cleaning gets awkward in a deep box |
| A-frame tractor | Small flocks, or a few broilers on grass | Moves to fresh ground | Low headroom; harder to secure at ground level |
| Walk-in shed coop | Larger flocks of laying hens | Stand-up cleaning and feed storage | Most lumber; more likely to need a permit |
| Shed conversion | Whatever the floor area allows | Reuses an existing building | Needs added vents, roosts, and a pop door |
Check any design against the space math above before you buy lumber. For example, NC State’s sample garden coop is a raised box. It leaves a dry, shady dust-bath spot underneath and holds four or five hens.
Meat birds change the plan. Broilers such as Cornish Cross grow heavy fast, and Penn State advises against perches for large, meaty breeds. So a broiler tractor needs floor space and shade, not roost bars.
If time is short, compare prebuilt coops by hen count against the same space figures. Many advertise more birds than their floor holds.
Free Chicken Coop Plans and Blueprints
Extension services publish the most reliable free chicken coop plans, because poultry and building specialists drew them. North Dakota State University keeps a public list of poultry building plans, each linked as a downloadable PDF.
Two small coops from that list show the range. Plan 6248 is a 10 by 12 foot layer house for 25 hens, with a raised wood floor. Plan ND 727-15-1 is a 6 by 8 foot shed-roof coop built on skids.
Most of these blueprints date from the 1920s to the 1970s, though. So check each one against current space figures before you build. Plan 6248, for example, gives 25 hens 120 square feet, or 4.8 square feet each. That clears NC State’s 2.5 to 3.5 square feet comfortably.
What a Usable Plan Includes
A plan you can build from shows these parts:
- A floor plan with every dimension
- Front, side, and back elevations
- Framing details for the floor, walls, and rafters
- A cut list and a materials list
- Sizes and heights for vents, windows, and doors
- Hinges, latches, and fasteners
A plan without a cut list still works if you measure carefully. However, a plan without vent and door sizes needs them added before you cut.
Materials and Tools
A simple chicken coop uses ordinary lumber-yard materials. Here is what a basic build needs:
- Framing: 2×4 lumber for the floor frame, walls, and rafters, with pressure-treated lumber for skids and anything touching soil
- Floor and walls: exterior plywood or siding, plus a sheet of vinyl over the floor for easy cleaning
- Roof: metal roofing, or shingles over plywood
- Wire: welded hardware cloth for vents, windows, and the run
- Fasteners: exterior screws, fender washers, hinges, and two-step latches
- Roosts: 2×2 lumber with the top edge rounded, as NC State suggests
- Litter: pine shavings
For tools, plan on a circular saw, drill, tape measure, speed square, level, tin snips, and shovel.
Oregon State Extension notes that coops can be built from wood, plastic, or concrete, new or recycled. It also lists pressure-treated or latex-painted wood as easy to clean for roosts. Even so, cut treated lumber away from the coop and sweep up the sawdust, so hens can’t peck at it.
How to Build a Basic Chicken Coop, Step by Step
These chicken coop instructions follow the order most plans use. Each step says why it matters.
Step 1. Check Local Rules and Pick the Site
Check local rules before you buy lumber. Many towns limit flock size, ban roosters, set distances from property lines, or require a permit for outbuildings. Our guide to local chicken ordinances covers what to ask. Some states also ask backyard flocks to register, and your state department of agriculture can tell you.
Next, pick the site. Penn State Extension advises high, well-drained ground, with the coop front, windows, and run facing south for sun. Oregon State Extension suggests building near the house, where people pass often. It also says to keep large plants away, since they give predators cover.
Step 2. Build a Raised, Level Base
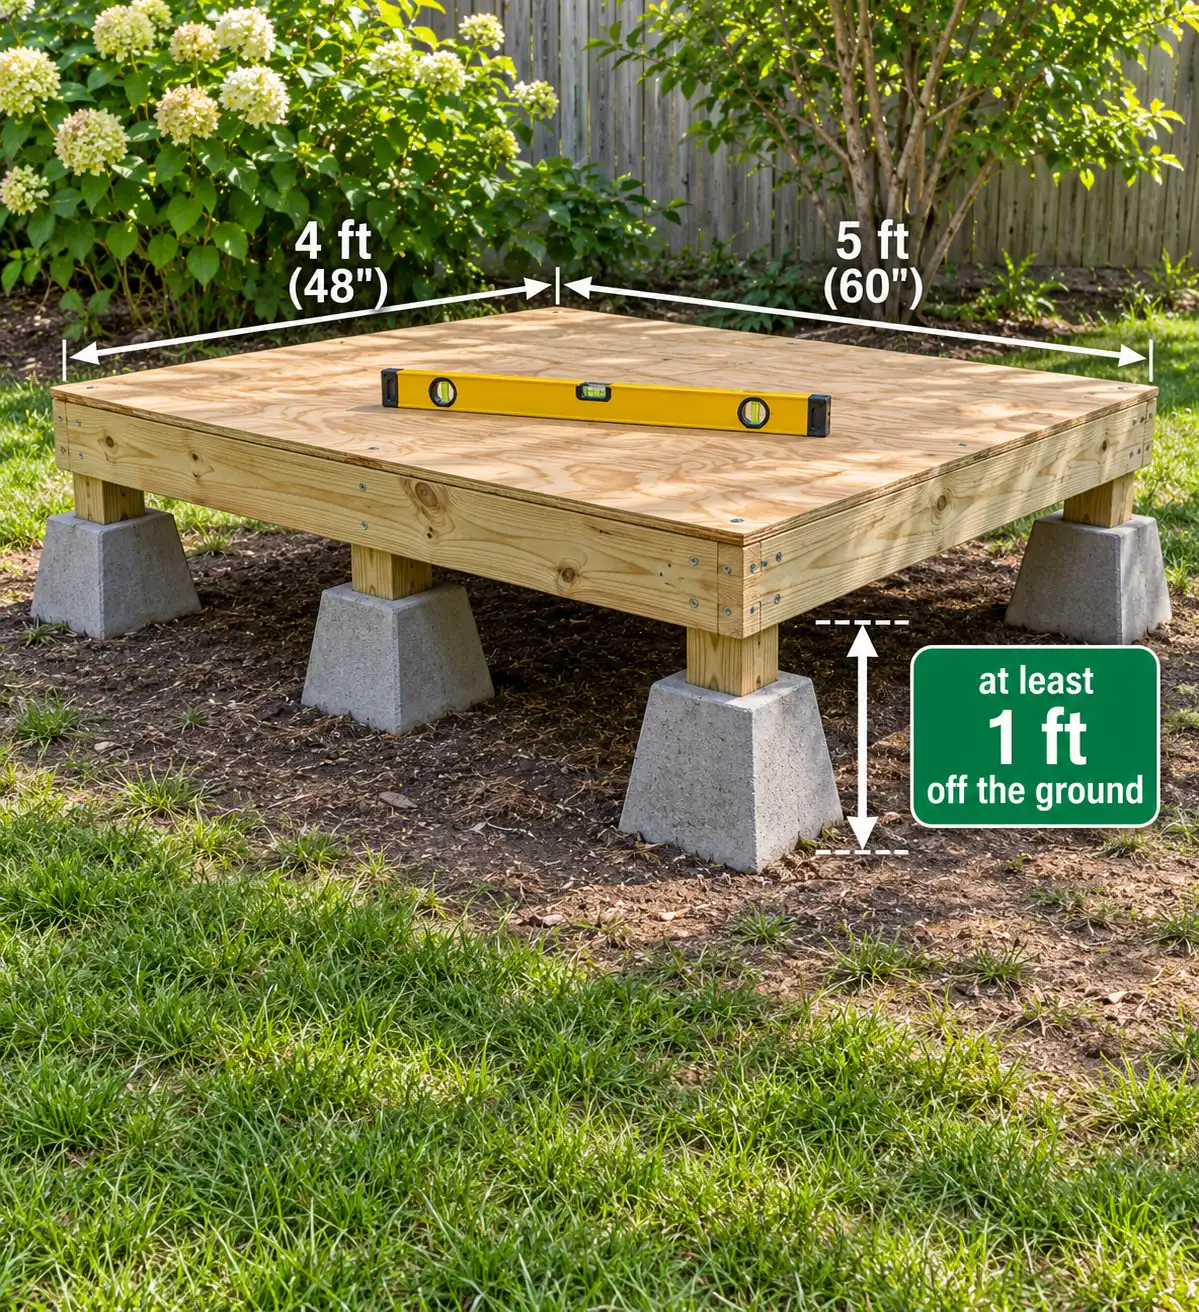
Oregon State Extension recommends raising the coop at least 1 foot off the ground. Use a secure floor, such as solid wood or concrete. That height keeps the floor dry and gives hens shade underneath.
First, set concrete blocks or pressure-treated skids at each corner and along long sides. Level them. Then frame the floor with 2x4s and deck it with exterior plywood.
Penn State and Oregon State both suggest a slight floor slope toward the door, so hosed water drains out. A vinyl sheet over the plywood makes that cleaning faster.
Step 3. Frame the Walls and Roof
Frame each wall flat on the deck, then stand it up and screw it to the floor. A shed roof is the simplest to build. Make the front wall taller than the back, so rain runs off behind the coop and away from the doors.
While you frame, leave openings at the top of the front and back walls for vents. Then sheathe the walls and roof the coop with metal or with shingles over plywood. Finally, let the roof overhang the walls, so rain doesn’t blow in through the vents.
Step 4. Cut Vents, Windows, and Doors
Ventilation removes ammonia, carbon dioxide, and moisture, per Oregon State Extension. For a small coop, Penn State Extension says windows or vents on one side are usually enough. Place them on the side away from prevailing winds, usually south or east, and never directly over the roost. Penn State also prefers sliding windows to swinging ones, so hens can’t perch on them.
Extension guides don’t publish a vent area for backyard coops, however. The common rule of 1 square foot of vent per 10 square feet of floor comes from builders, not trials. So treat it as a starting point. If the litter stays damp or you smell ammonia at hen height, add more vent area up high. Our guide to vent placement and coop lighting goes further.
Last, hang the people door and the clean-out door to swing outward, as Oregon State suggests. That way, litter never jams them.
Step 5. Cover Every Opening With Hardware Cloth
Chicken wire keeps hens in. It does not keep raccoons, foxes, or dogs out. So cover every vent, window, and gap with welded hardware cloth. Fasten it with screws and fender washers every few inches, rather than staples alone.
Penn State Extension also calls for heavy-gauge mesh wire or screening over any window or door left open. Check the corners and the gap under the roof, too, since gaps there are easy to miss.
Step 6. Install Roosts and Nest Boxes
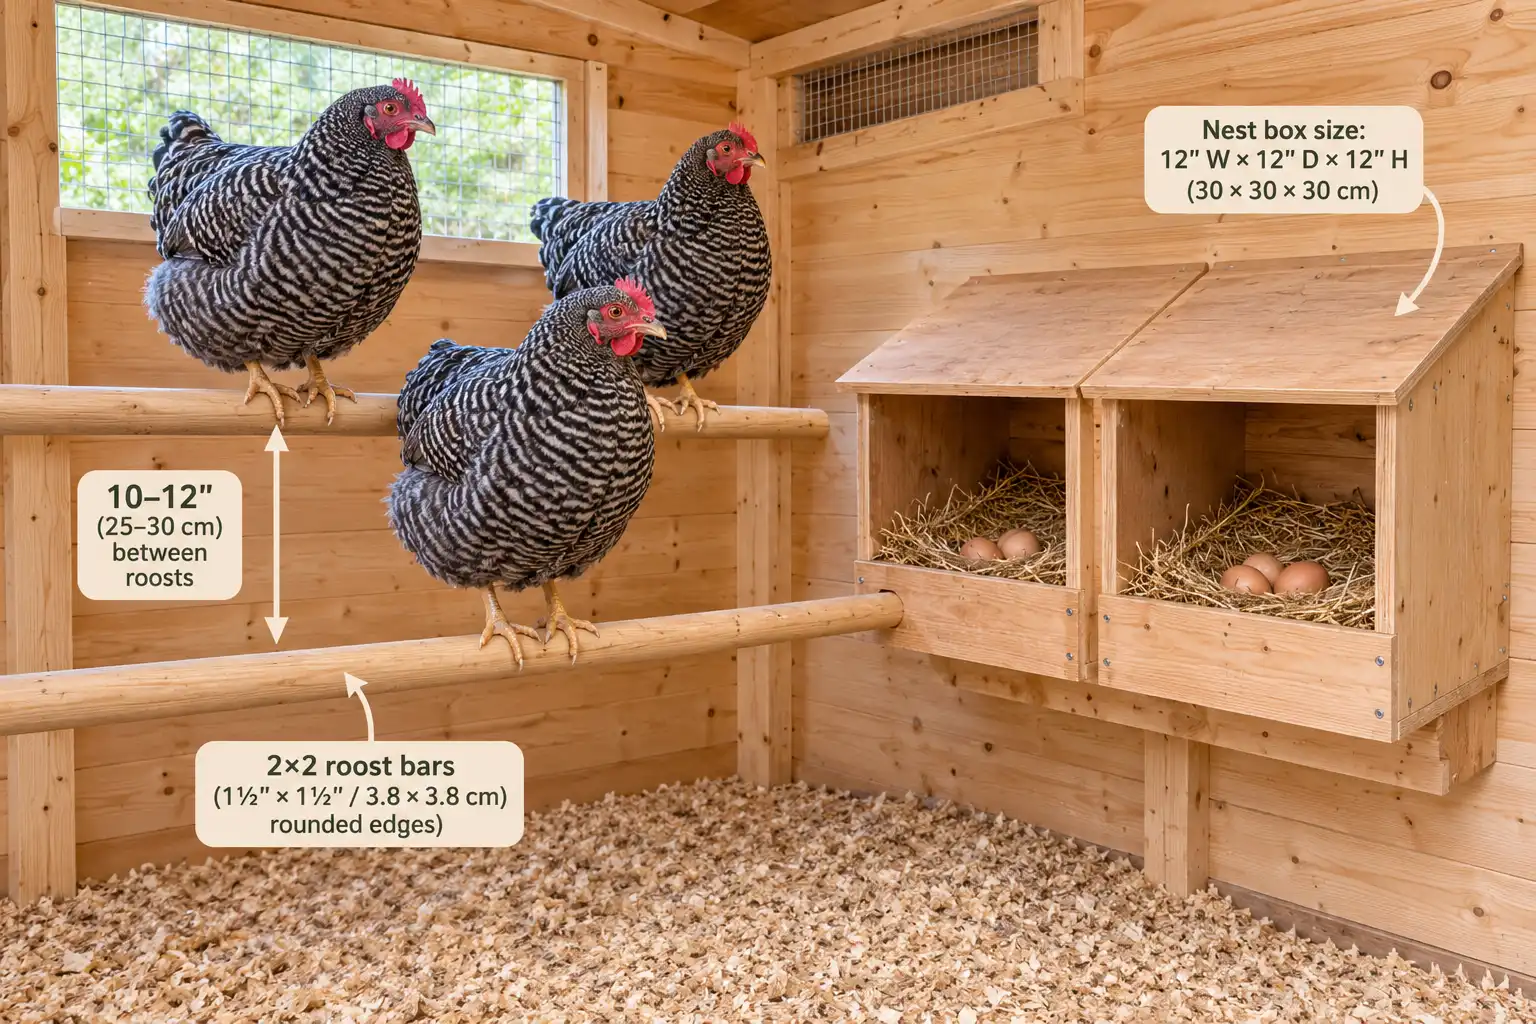
Roost figures vary by source. NC State Extension asks for at least 9 to 10 inches of roost per laying hen, with bars 14 inches apart. Penn State Extension gives 6 inches per standard-size hen, on bars 1 foot apart and 18 to 24 inches high. For bantams, Penn State drops that to 4 inches each, set 12 to 18 inches high.
Oregon State Extension recommends one nest box for about every four hens. Each box should be about 12 by 12 by 12 inches. A 45-degree sloped top keeps hens from roosting on it. Penn State adds a 3 to 4 inch front lip to hold the bedding in.
Nest height is where the sources split. Oregon State and NC State both keep nests no lower than the roost bars. Penn State instead puts nests at least 2 feet off the ground and at least 4 feet from the roosts. Many builders set the roosts highest so hens don’t sleep in the nests. If hens start sleeping in the boxes, block the nests at dusk. Our roost and nest box setup guide covers layouts in detail.
Step 7. Build a Predator-Proof Run
Penn State Extension calls fenced, covered runs the best protection from predators. It says to bury the run wire at least 12 inches deep and turn it outward about 6 inches. Medium gravel on top discourages digging. NC State Extension allows a shallower option: wire buried at least 6 inches deep. Or bend it outward at least 12 inches across the soil and pin it with landscape staples.
For the run walls, Oregon State Extension specifies 1 by 2 inch mesh fencing. Then roof the whole run with wire or solid roofing. A covered run also keeps wild birds away from your hens. USDA APHIS recommends covered enclosures and netting for that reason. See its guidance on protecting flocks from avian influenza (updated May 2026, checked November 2026).
If birds sicken or die suddenly, call your veterinarian, state veterinarian, or USDA at 1-866-536-7593 the same day. For fencing and latch choices, see our guide to predator-proofing a run.

Step 8. Add Litter, Feeder, and Water
NC State Extension recommends about 4 inches of absorbent litter, such as pine shavings, stirred often. It also allows 3 linear inches of feeder space per adult laying hen. So six hens need 18 inches of feeder edge. Meanwhile, Penn State suggests placing waterers in the run, which keeps the coop floor drier.
Planning to run power? Penn State says one light of 40 watts or less over feed and water suits most small coops. Skip loose heat lamps, though. A lamp that falls into dry shavings can start a coop fire.
How to Build a Chicken Coop Door
A coop needs two kinds of doors: a small pop door for hens and a larger door for you. Penn State Extension says only that a doorway should let birds pass through easily. So pop door sizes come from plan conventions, not research.
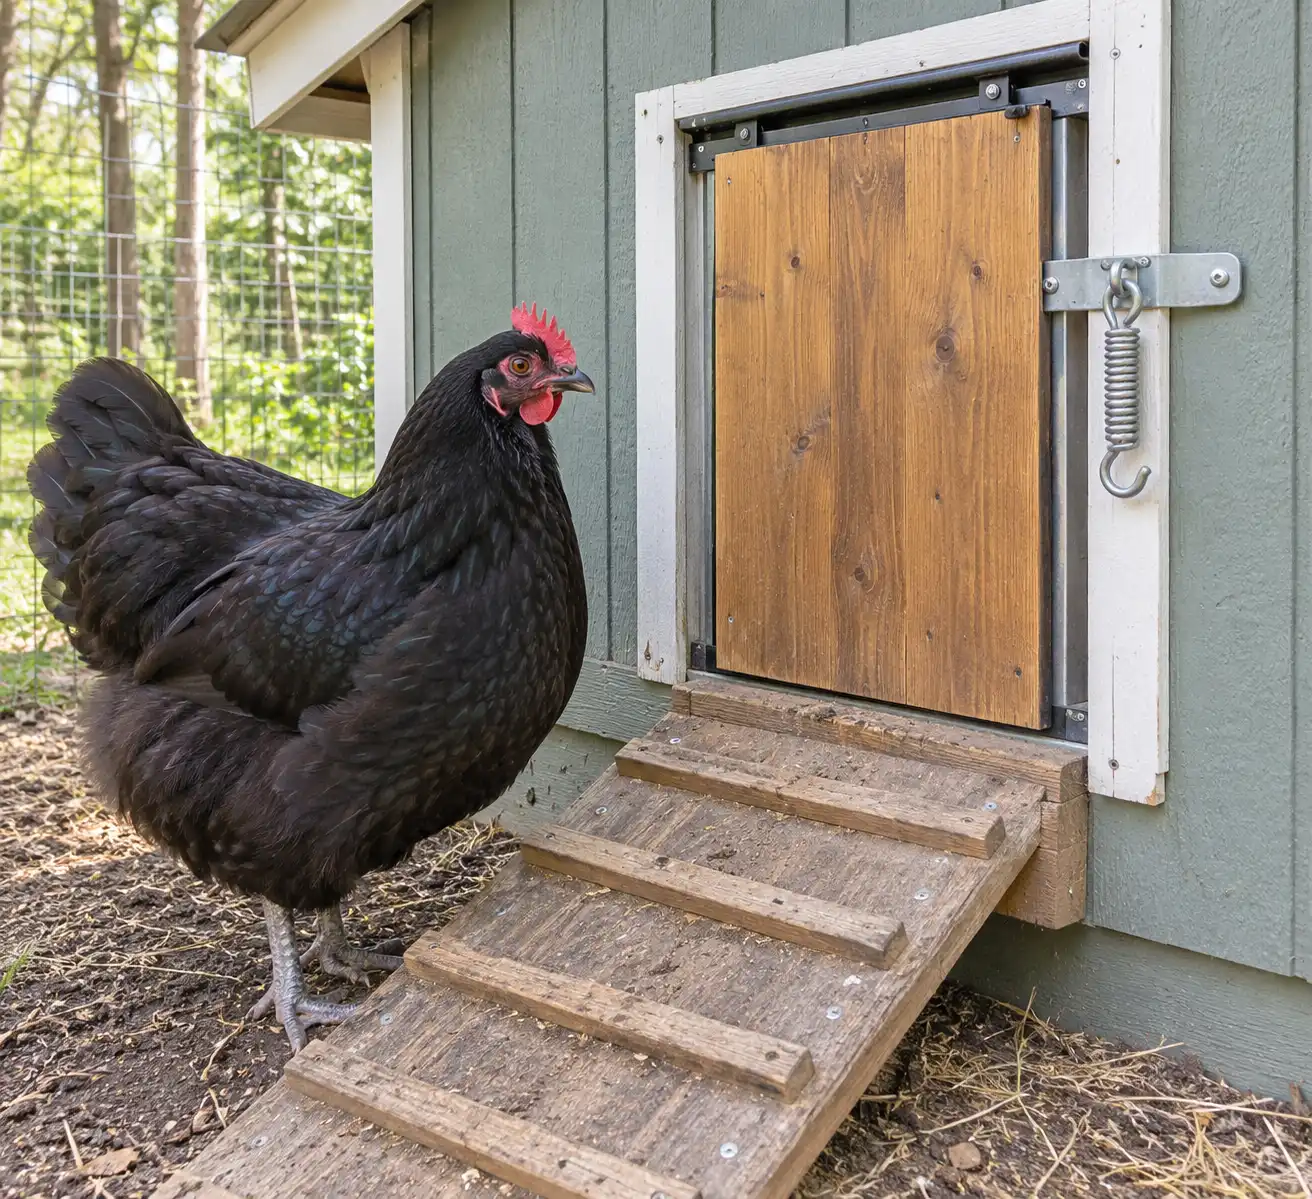
Most plans cut the pop door about 12 inches wide and 12 to 14 inches tall for standard-size hens. Set the sill above the litter line. With NC State’s 4 inches of shavings, a sill 6 inches above the floor keeps bedding inside. Then add a ramp with cross cleats if the door sits well above the ground.
Sliding or Hinged?
A vertical sliding door runs in two wooden tracks and drops shut under its own weight. As a result, it works well with a pull rope from outside the run, or with an automatic opener. A hinged door is simpler to build, but it needs clear swing space. For the people door, hang it to swing outward, as Oregon State suggests.
Locks That Hold
Use a latch that takes two motions to open. A spring hook through a hasp works, as does a barrel bolt pinned with a carabiner. Raccoons can work simple hooks and turn buttons. Close the pop door every night at dusk. If evenings are hard to keep, fit one of the automatic coop doors that runs on a timer or light sensor.
How to Build a Chicken Coop Out of Pallets
Pallets make good siding, nest boxes, and run panels at little cost. However, they make poor structure. Frame the floor, corners, and roof with new lumber, and use pallet boards for the skin.
Check the Stamp First
Look for the ISPM 15 mark before you take any pallet. USDA APHIS says the mark includes the IPPC logo, a two-letter country code, a facility number, and a treatment code. That code is HT for heat treatment or MB for methyl bromide.
HT means the wood was heated, not chemically treated. MB means a pesticide gas fumigated it, so leave it out of a coop. An unstamped pallet tells you nothing about its history. So judge every pallet by condition, and skip any with stains, spills, or a chemical smell.

Size a Pallet Coop
The common 48 by 40 inch pallet sets the box size. Pallets set on edge give a coop about 4 by 3.3 feet, or roughly 13 square feet. At NC State’s 2.5 to 3.5 square feet per hen, that holds 3 to 5 laying hens. At Oregon State’s 3 square feet, it holds 4.
Pallet Build Tips
Cut slats free with a reciprocating saw, since prying splits them. Then line the inside with plywood or extra boards to close the gaps between slats. Gaps let in drafts and rodents. Cover any vent openings with hardware cloth, and prime and paint the outside to slow rot.
Common Coop Building Mistakes
Most coop problems trace back to a few build choices. Here they are, with the fix for each:
- Sizing for chicks: Day-old chicks fit anywhere, but adult hens need the full floor from the table above.
- Chicken wire on vents: It keeps hens in but not predators out. Replace it with welded hardware cloth.
- Sealing the coop for warmth: Closed coops trap moisture and ammonia. Keep high vents open year-round.
- Vents over the roost: Air blowing on sleeping hens chills them. Move vents above or away from the bars.
- Doors that open inward: Litter jams them. Rehang them to swing out.
- Flat-topped nest boxes: Hens roost on top and soil them. Add the 45-degree top Oregon State recommends.
- Corners you can’t reach: Oregon State plans for weekly cleaning, so you need to reach every area.
- A low run roof: NC State’s sample run lets you stand upright inside. Crouching makes daily chores harder.
- Heat lamps over bedding: A fallen lamp can ignite shavings. Plan safer heat, or none, for adult hens.
FAQs About DIY Chicken Coop Designs
What is the cheapest way to build a chicken coop?
Reused materials keep costs lowest, such as heat-treated pallets, salvaged plywood, and an existing shed. Spend your budget on hardware cloth, hinges, and latches, because those parts decide whether the coop actually stops predators.
How big should a coop be for 6 chickens?
Six standard-size laying hens need 15 to 21 square feet of coop floor, per NC State Extension minimums, so a 4 by 5 foot coop works. Add a run of at least 24 to 30 square feet.
Should a chicken coop have a floor?
Yes, a solid floor stops digging predators and rodents. Oregon State Extension recommends a concrete slab or solid wood floor on a coop raised at least 1 foot off the ground, sloped so it drains when hosed.
Can I use chicken wire on a coop?
Use chicken wire only to keep hens inside a fenced area, not as predator protection. Raccoons and dogs can break or reach through it, so cover vents, windows, and run walls with welded hardware cloth instead.
How high should chicken roosts be?
Penn State Extension sets roosts for standard-size hens 18 to 24 inches above the floor, and bantam roosts 12 to 18 inches. Oregon State Extension uses 2 feet, with 10 inches between bars.
Do I need a permit to build a chicken coop?
It depends on your town. Many local codes treat a coop as an accessory building, so size limits, setbacks, and permits can apply; call your zoning or building office before you buy materials.
Where can I find free chicken coop plans?
Land-grant extension services publish the most reliable free plans. North Dakota State University keeps a list of downloadable poultry house plans, and NC State Extension’s garden flock guide includes a sample coop for four or five hens.
Before the Hens Move In
Finish the coop before the hens arrive, so the paint can dry and you can test every latch. Then walk the run line for gaps, and check that no vent blows across the roost. A coop sized from the table, raised, vented high, and wrapped in hardware cloth covers a small laying flock’s needs.